Tuesday, December 6, 2016

Learning How to Unlearn

What does it mean to unlearn how to learn? Seyi Fabode on The Huffington Post explains the following:

So what is unlearning? It is to let go of the things which you have learned. A visual works here. Take a cup, learning represents filling up the cup and unlearning would represent emptying the cup. You empty the cup and fill it up again. You might empty the cup of water and fill it up with a nice nutrient laden smoothie. Same cup, different drink. Continue the loop.


www.quotesgram.com

Our students truly have answers at their fingertips whenever they need them. Problem solving, thinking, learning, looks very different today than it did a decade or two ago. With that in mind, teaching must look differently today. Students must learn how to "empty their cups and fill them up again" with different knowledge. 

Close your eyes and invasion a typical, traditional history classroom setting. Do you picture students in rows "listening" to the teacher as he/she lectures? Do you picture students with their textbooks open, mouths closed waiting to here, "This will be on your test"? 

Many students have become masters at school. What do I mean by that? Many students have learned how to learn; they've learned how to play the game. "Let me wait until I get the study guide, memorize the heck out of the study guide, take the test, repeat." Those very same students are the ones that need to truly learn, unlearn and relearn. They need to be the ones that are pushed outside of their comfort zones, given a chance to curate their knowledge and lead discussions. This is what led to our amazing journey on recreating the Decision Points Theater. There is this wonderful, simulated theater at the George W. Bush library on the SMU campus.
  • Critical Decisions - Play the role of President and dive into the decision-making process in our interactive Decision Points Theater. Hear from presidential advisers and voice how you would act as President when faced with major crises such as Hurricane Katrina or the troop surge in Iraq.
Click here to view one of the Decision Points in order to better understand what took place.

After visiting the theater, a few teachers and I had the idea to recreate the same idea with our students. Students were learning about the American Revolution and Patriots and Loyalists. Instead of simply having the students read the textbook, complete a few small activities, and take a test, we decided to create our own Decision Points Theater first, which would then lead to the students creating their own Decision Points Theater in the spring. We pulled in 5 teachers for help: a newscaster, a patriot, a loyalist, and two reporters. We used Touchcast to put our video together which argued why someone should be a patriot/loyalist. The students got a big kick out of the experience because they saw their teachers acting (insert: making fools of themselves). After they watched the 6 minute Decision Points video, the students were asked to vote using Socrative on whether they would have been a Patriot/Loyalist. Our intended outcome was to discuss Patriots/Loyalists and the pros and cons to both sides. Our true outcome was just that, plus discussing the fact that the president must make decisions on a regular basis. We discussed that he doesn't simply make a decision alone. He uses his own judgement along with many many other advisors facts and opinions. Stay tuned in the spring when we have the students creating the Decision Points Theater. I am certain their creations will be tenfold better than our creation. 

Cited sources:
http://www.huffingtonpost.com/seyi-fabode/you-must-learn-how-to-unl_b_8617796.html
http://georgewbushlibrary.smu.edu/en/Visit/Exhibits.aspx


Wednesday, November 30, 2016

Dialogue Journals Deepen Student-Teacher Relationships


In August, I challenged myself with finding more and more ways to encourage my students to find their voices as they develop and share their passions. I came across a Cult of Pedagogy podcast titled, "How Dialogue Journals Build Teacher-Student Relationships." You can read the article and listen to Jennifer Gonzalez's podcast here. Gonzalez interviews Liz Galarza who uses dialogue journals in her classroom.

We spend 5 days per week with our students, but how well do we know them and how well do they know us?

What are dialogue journals according to Liz Galarza?

  • Dialogue journals are ongoing written conversations between a teacher and a student in the form of a letter
  • a written conversation as opposed to an oral conversation
  • usually finds complaints and questions in dialogue journals which are missing in normal classroom discourse and conversation
  • students choose the topics of conversations which allows them to share their passions or questions
  • teacher writes the first entry in every journal that is personalized to each student and then asks them to respond
  • teacher models the length, tone, format...
What happens if the conversation falls flat or students haven't bought in to the journals?
  • she usually responds with, "This is a place where you can talk about anything. What do you want to talk about? Teach me something." 
    • tends to empower students
  • goes back to original "all about me" sheet and starts to ask questions about information on all about me sheet
  • accepts one sentence and she responds in a small amount; realized through research that if she responds with too many sentences, student feels overwhelmed and thinks either, "I can't write that much or I don't want to"
    • realized not to ask too many questions because it puts teacher in authoritative role so tries to get them to ask the questions 
    • by disclosing information about her own life (not in question form) she realizes that it opens the door for them to feel comfortable and share
    • the more real the kids see her, the better the relationship will be and the more they see themselves as important people
Where do you store the journals?
  • trays in classroom labeled with periods
  • turn in on rotating basis so she doesn't get all in one day
What happens if they write about something that needs to be discussed with an administrator or counselor?
  • she explains at beginning of process that she will come to student first before going to admin
    • explains that many students are writing it for that reason - a cry for help
How do you grade the journals?
  • no grade for content, grammatical errors...
  • journal is for relationship purposes
  • if they spell a word wrong/write something grammatically incorrect, she will respond with the same word or grammar to model how to use it correctly and hope they see her usage
  • only grade = them handing it in (completion grade)
    • the more you put a grade on something, the less empowered the student feels (very interesting comment and point she makes here)
    • the more a teacher requires something, the less empowered a student feels so next year she is thinking of not grading at all and not making it mandatory 
What benefits/affects/impacts has Mrs. Galarza experienced due to dialogue journals? Why should teachers try this?
  • become better writers overtime by writing in these journals
  • students are looking for an authentic adult to hear them and converse with them
  • mentor text 
  • closer to speech than other writing styles which is easier for lower leveled students
  • teach a skill within journal (Example- highlighting a sentence and saying, "You could use a semi colon here instead of a period.) as long as they are going to be receptive
  • leads to a class grammar mini lesson if notices many students are misspelling or misusing same thing over and over
  • a way to collect data from students 
  • gain insight into their thinking and feelings (for example- a grandmother just passed away)
  • journal is all about dialogue and differentiation 
What if I am a non-English teacher? Are journals worth incorporating?
  • math teacher- base on math questions; a little more prompted
    • example) write in journal something you liked, understood, didn't understand, want to review with you
  • believes it could work in any classroom/discipline

Who remembers the movie, "Dangerous Minds?" After listening to the podcast and reflecting upon what Mrs. Galarza discussed, I immediately thought of the movie "Dangerous Minds" in which the teacher asks the students to write in journals. At first, the students are incredibly apprehensive and have not bought in to the idea of the journals. However, their mood and mindset quickly shifts and her unsuccessful classroom quickly becomes a learner-centered classroom with student buy in. I attribute much of her success as a teacher on the investment she made to get to know her students. 

Upon reflecting, what did I take away from this podcast?
  • Do I spend my time checking in with my students? Do I need to invest more time on the relationship aspect? More time on giving them an empowered voice? 
  • kids move from elementary to middle school and philosophy changes; middle school teachers are teachers of content, of transmission
    • elementary teacher's philosophy is that you are teaching a child over teaching content
  • could these lead to connections? (If a student shows interest in geography, could you connect them with an expert to deepen learning?)
  • Galarza explained, the way in which we empower our students or give up our own control, is by giving them the power to have valuable things to say 


Tuesday, November 8, 2016

The Value of Focusing on the Process Rather than the Product

"Is this for a grade?" Does that question make anyone else's skin crawl like it does mine? I tend to respond with, "Well, does it matter? Shouldn't we put the same amount of effort and time into everything we do no matter if it is for a grade or not?" I realized why our student's ask that question CONSTANTLY. To put it simply, we, as a society, focus on product over process. We focus on the grade and how to earn that grade as opposed to focusing on the learning that occurs throughout the process. We should be focusing on things like, "Did we allow room for failure and resolution to occur? Did we allow time to test out their presentation in order to allow room for editing and growth? Did we provide time for teaching the soft skills?" We should be asking ourselves, "Did my students realize the importance of being a part of a team and sharing roles equally?" Now, don't get me wrong, the product is an important piece of the puzzle and usually what the rest of the world sees. But, sometimes I focus so much on the product, that I miss the small learning moments that are occurring right in front of my eyes.

I was asked by one of our amazing 5th grade English teachers at our school to partner with her and create a cross-divisional project between our lower school and 5th grade students. Last week, our 6th-8th grade students were gone most of the week on overnight class trips which left our 5th graders at school, all alone. Womp womp! The 5th grade teacher wanted to expose her students to a project that would not only help tie two of our divisions together, but also put the 5th graders in the driver seat of their learning and truly hit on a lot of those soft skills that are sometimes, unfortunately, missed. Her idea was to ask the lower school teacher's for a topic that our 5th graders could teach to their 1st-4th grade students. The 5th graders would spend 2 days creating the lesson and the 3rd day presenting the lesson to the lower school students. Man were we exhausted after those 3 days! What most people saw was the end product - the 5th graders' messy presentations that were delivered to the lower school students. What they missed was seeing the learning and failure that took place in the classrooms over those 2 days as they prepared to be the teachers. The presentations were truly just that - messy. There were many hiccups during the actual presentations themselves- technology wasn't working in some cases, teammates weren't getting along during the presentation, the facts were missing, grammatical errors... After having the students reflect on the process daily, the other teacher and I quickly started to see the huge benefits of the project. Students were having to deal with conflict resolution, choosing roles, finding a way to successfully collaborate, create and execute.

One of my favorite outcomes of this process was the growth that I saw from a former student, let's call him Joe, whom I taught the previous year in 4th grade. Joe was diagnosed with ADHD, has a very difficult time collaborating with others, and even has some anger challenges. As Joe and I entered the 2nd grade art classroom in preparation for him and his group to present, I was not expecting to see and experience what occurred. Joe, a normally hyperactive, challenging student, was exceptional. Joe was helping a 2nd grader draw a sketch of a horse.
Joe: "Now, what color are the horse's legs towards the top?"
Student: "Umm looks like a dark brown."
Joe: "Great! Now pick up the color brown and lightly shade the horse's leg. Now, what color do the horse's legs become as they get closer to the hooves?"
Student: "Kinda a light brown color?"
Joe: "Yes, and how are we going to make his legs lighter brown if we only have one color brown?"
Student: "Hmm maybe we could lightly shade with the brown and then lightly color over the brown with the white?"
Joe: "Yes! You're doing a great job. I can tell that your horse is going to be great because you are putting a lot of effort into it!"

A normally unfocused, challenging student acted as the perfect, encouraging mentor to a younger student all because of this project.

Other outcomes of this project:
  • failure (Student's realized by testing out their original plans that certain plans were not going to work and failure was okay. They had to figure out a plan b since plan a didn't work. For example, one group created a quizlet that they planned to use with the lower school students and when they were teaching, the quizlet live feature, which is what they wanted to use, would not work. They realized quizlet live is only a feature that teachers can use and spur of the moment had to create a plan.) Too often we don't see the value in allowing our students to fail and want to save them every chance we get.
  • the power of reflection (I learned by observing the 5th grade teacher guide the student's through a series of reflection that I must pencil in time throughout a project, not just at the end, for my students to reflect. Reflection allows for growth.)
  • collaboration (The 5th grade teacher did an amazing job of not simply telling them the outcome of the project. She started out explaining the project as a whole, but then placed mini lessons every hour or so to teach specific skills. For example, they had to take part in brain teasers and riddles in order to learn how to work together as a group. Too often teachers say, "I want you to create a presentation to teach your audience about Veteran's Day. Go!" But they don't take the time to explicitly teach creativity, teamwork, leadership, listening, reflection, affective communication skills...) 
The reason this project was so successful, even though the products were messy, was because of the organization, time, and reflection that the 5th grade teacher implemented. She took the time to explicitly teach the soft skills, allow room for failure, problem solving and reflection time.  The students have already begged for another project similar to this one. 

Monday, November 7, 2016

Canva in a Writing Class

A colleague of mine came to me seeking ideas. She teaches our 5th graders Fundamental Writing and in the past had her students come up with a list of life lessons that they have learned thus far, create a presentation, and present their life lessons to their classmates. However, this year she didn't see time in her schedule to complete this entire project, but still wanted the students to create something on a smaller scale. When she came to me, our original plan was to use Adobe Spark Post, but the age restrictions would not allow our students to use the app. Instead, we chose to use an app called Canva.

Step 1: Students chose a topic that taught them multiple life lessons. For example, "Life Lessons Learned from Dance."
Step 2: Students wrote down 7-8 life lessons that they learned from the chosen topic.
Step 3: Students chose at least 4 of the life lessons to illustrate using Canva.
Step 4: Students were asked to create a title poster and then at least 4 other posters. Each poster had to have a sentence that describes the life lesson that was learned along with a picture to illustrate the lesson learned.
Step 5: Students were asked to save the design to their google drive folder.
Step 6: The teacher created a google doc with each student's name listed. Students were asked to get the link from their google drive folder that would take you directly to their canva design and paste it in the cell next to their name.
Step 7: Students were asked to open and view other classmates' designs. 

Other ideas on how to use Canva in a classroom setting?
  • Social Studies/History: pretend to be a marketer and design a flyer on Canva persuading people to travel to your colony/state
    • click here for a historical infographic idea
  • Back to school: create a design for "all about me"
  • Language Arts: click here to read about a visual poetry idea

Monday, October 17, 2016

A Reflection on the Lifelong Learner Mindset

As the Edudemic Staff stated, "Doctors, lawyers, and other professionals never stop learning new techniques and strategies to hone their craft and remain on the cutting edge in their field- and so, too, do teachers," ("Lifelong Learning is a Crucial Educational Mindset"). Recently, I challenged myself with continuing to have a lifelong learner mindset in order to continue to build a network with other likeminded educators.

After reading "Lifelong Learning is a Crucial Educational Mindset," an article published by Edudemic, a few comments truly made me ponder:

  • lifelong learning is an essential challenge for inventing the future of our societies 
  • a lifelong learning mindset creates the challenge to understand, explore, and support new essential dimensions of learning such as: 
    • self-directed learning
    • learning on demand
    • informal learning
    • collaborative and organizational learning 
  • lifelong learning fosters creativity in the information age
This article brought to the forefront of my mind the true importance of educators taking on the role of being lifelong learning, as well as the importance of teaching our students to have a lifelong learner mindset. This mindset creates the stamina to self-direct their own learning, to learn on demand, to learn in groups, to start a conversation- all things that lead to successful business owners, employees, and community contributors. The lifelong learner mindset helps us to overcome obstacles and know what to do in the hands of failure. 

This article also left me pondering a few questions myself:
  • How do lifelong learners encourage other people that do not have a lifelong learner mindset to self-direct their learning?
  • How can the world of education grow and become better if we do not all have a lifelong learner mindset?
  • If you are at a school where the lifelong learner mindset is rare, how can one help the teachers to see the benefits that a lifelong learner mindset has on their career?
The article stated, "The best teachers are willing to learn from their students," (LLCEM). We as educators must allow learning to come from outside resources (books, blogs, websites...) as well as inside resources (students, other teachers, parents, administrators...).

Who are lifelong learners?

  • self-starters
  • innovators
  • tech lovers (willing to allow students to learn and teach about tech usage)
My favorite quote from this article came towards the end when the authors inquired, "Can a teacher successfully educate students without becoming a lifelong learner?"(LLCEM). The authors also stated, "...teachers who adopt this mentality are more than excellent educators; they're excellent models for their students," (LLCEM).

Resources: http://www.edudemic.com/lifelong-learning-educational-mindset/

Tuesday, October 11, 2016

Making Math Lessons Authentic and Hands-On

Each unit in 4th grade math, my teaching partner and I are always looking for a way to make the math lesson meaningful and hands-on to truly take their learning to the next level. Too often a math lesson goes a little something like this:

  • teacher teaches lesson to whole group
  • students go back to seats and practice the concept
  • students go home and work on homework worksheets to prove mastery
  • repeat
  • review for test
  • tes
The problem with this? Student masters that concept for that period of time, learn it for the test, then poof! It leaves their mind until the next school year.

As a math teacher, I know the importance of giving our students time to practice a concept, inquire, grow, and make mistakes. I also know the importance of ensuring that the lesson is connected to real-world learning. The importance of showing our kids that the concept they are learning today, truly is used in the real-world. And of course, the importance of making that lesson fun. 

Last unit the students were exploring multiplication and division arrays and we brainstormed different ways to get our students to create something that would put these skills to work. (And, in all honesty, we needed something to put in the hallway. I know you elementary teachers feel me on this one!) We had also been discussing factors and multiples - a challenging concept for 4th graders to truly master. Our brainstorm went a little something like this:
  • have students work in partners to research skyscrapers in our world
  • use those skyscraper heights to compare and contrast to one another (For example, students would explain that Skyscraper X is 3 times the height of Skyscraper Y.) 
We quickly realized that this wasn't necessarily going to work for our objectives and altered our thinking:
  • students would work in partners to create a skyscraper and name their building
  • students would decide how many windows that skyscraper would have and write an array to match the number of windows (For example, 5 X 7 = 35 windows)
  • students would then double, triple, quadruple and half that number of windows to practice multiplication and division
  • students would choose one of their new arrays and create a new building with that many windows
  • students would write a sentence comparing their two buildings and window arrays
  • students used black construction paper to create buildings
  • students used the Canva App to create their poster to match their building which included the 2 arrays, a picture of their buildings that they created, and a sentence comparing the two buildings


Initially, we intended for this project to take us 2 days in class to complete. We must've been dreaming! It took closer to 5 and part of the 6th day to truly complete the project. At first, we reflected and thought, "Man, that was a fun project but it sure set us back in our lesson planning a few days!" The kids collaborated, inquired, problem-solved, used technology to show their thinking, compared, analyzed, led... because of this one project. Yes, it took more time than we anticipated. Yes, it was a lot of work. But, it was well worth it. We ultimately reflected and discussed the fact that our thinking as teachers must change to allow for more hands-on, authentic moments in our classroom. We have to be willing to let some things go. Why does every unit have to be followed by an exam? Couldn't the project count as the exam? Could we flip our lessons so that they students are still hearing us teach at night by using recordings? 

One of my favorite things that came out of this project was the fact that some of our students truly took the learning and connections above and beyond what I expected. I was anticipating most students to complete projects similar to the ones pictured above. And, in fact, most did look similar to the ones pictured above. But, some students took the liberty to go out on a limb and connect their learning to a lesson we had previously taught. Some students chose not to compare and contrast the window arrays by simply saying, "Building 1 has 3 times the number of windows as Building 2." Instead, they come up with this:
Never was I expecting our students to use factors and multiples to compare their window arrays, but they did! They used what we had taught them previously to create their comparison. What?! 

It's projects like these that truly make me reflect on my goals as a math teacher. Am I trying to get my students to know how to take tests? To complete problems on a worksheet? To learn in the manner that many math classrooms run? Or, am I trying to get them to use soft skills alongside problem-solving, hands-on and authentic learning? We must allow for room in education for our students to take learning into their own hands all while being okay with our lesson plans changing. 

Tuesday, October 4, 2016

When the Student Becomes the Teacher

As a 4th grade math teacher I am always looking for ways to put my kids in the driver seat. I am always trying to find ways for them to be doing the teaching rather than me. How can I give them a real audience? How can I allow them to take more ownership in their learning? How can I provide them with more of a voice in my classroom? After reflecting on those (and many more) questions, my teammate and I decided to give Seesaw a shot in our classroom and man was it a success! The kids absolutely loved their homework. Yes, you read that correctly. They loved doing their homework! They loved that they could watch each other's videos, like the video, and even comment on videos. They liked that they were not completing a worksheet for once.

So let's back up... A normal night in 4th grade math consists of student's completing a worksheet covering a topic that they learned either that day in class or recently. Worksheets can be necessary on one hand, but really don't provide room for differentiation, checking for understanding, or insight into the student's thinking. We were teaching our kids how to use an addition method known as partial-sums method and many kids were struggling with how to use this method. My teammate and I decided that this would be a great time to use the Seesaw app because we would quickly be able to assess who understands the method and who needs some extra help. Plus, bonus, it gave them a real world audience, their classmates. Each kid was asked to go home and use the whiteboard feature on the app and create a quick, short tutorial that would teach someone how to use the partial sums method. We quickly not only realized who has mastered the method and who hasn't, but also who has great public speaking skills and who needs some work. The kids learned a very valuable skill that happens daily in our world - commenting on each other's work. Training wheels for one day when they have social media accounts. We were able to use a controlled app to teach them appropriate ways to comment/like each other's work and leave a positive digital footprint. What were some of their reactions when they came to school the next day?
"That was actually fun homework!"
"Can we use Seesaw again?"
"I liked how one of my classmates used a hard problem. It really showed that they were challenging themselves."
"I liked that I could watch other people's videos and learn from my classmates."

Seesaw can always be used in reverse where the teacher creates a video to share with their students. Think flipped classroom.

Here is an example of one of the Seesaw videos that a student created teaching the Partial-Sums Method: http://tinyurl.com/znvlr4v

Wednesday, September 28, 2016

What Happens When an English Teacher and an Instructional Coach Team Up?

This school year I was challenged by our Director of Modern Learning to partner with at least one teacher every month and collaborate on a project. It just so happened that one of our Middle School English teachers sought me out. "Hey! I read this book with my kids called The Wednesday Wars every year, but this year, I want to do something cool, fun, hands-on and engaging with them to get them to really understand the theme of the book. Can you help?" I'm your girl! Over the past month, the two of us have had multiple meetings to put this project together. Where did we start? What is the process we are going through? What's the outcome? I can answer a few of these questions, but the project has not come to an end just yet so check in soon to see our student examples and further reflections.

Where did we start? To begin, I asked her what her objectives were and what, if anything, students in the past have struggled with understanding or grasping with this novel study. She said that she wanted her students to understand the "coming of age" message that is taught throughout the novel. (See our jumbled, original notes and ideas here.) Originally, we wanted the end result to be her students interviewing someone at home that could share a life lesson/coming of age story with them and then we would have the students share these interviews with their classmates. As we continued to talk, we further developed the project- adding in elements of writing, debating, synthesizing, applying, teaching, a public speaking element, and connecting with other students in different grade levels.

The teacher in The Wednesday Wars novel uses 7 different works written by Shakespeare to teach her student, Holling, lessons about life. We used this hidden message within the novel to develop our project.

Check out our full, updated (still messy) Lesson Plan here.

In a snapshot, our project looks a little something like this:

Step 1: Discuss the 7 Shakespearean stories that are scattered throughout the novel with the students. Students will split into groups to research 1 of the 7 Shakespearean stories and then present their research to the class. The class will be expected to take notes while other students present their research.

Step 2: Discuss the concept of the interview with the students. What are you trying to get from your interview? Why are we interviewing people? A group of digital production upper school students will create a "How To Interview" video that teaches the middle schoolers interviewing skills and the video will be shared with the middle school students.

Step 3: Students will continue to work on the interview at home. They will need to cut the interview down to 90 seconds.

Step 4: Students will then be asked to think of the lesson/coming of age story that the person they interviewed shared with them and decide which of the 7 works of Shakespeare it is connected to. They will have to defend their answer in writing on a discussion thread and comment on other student's work allowing for room to debate answers and beliefs.

Step 5: It just so happens that the 5th graders completed a life lessons project (check it out here) in September. Middle school students will be asked to view a few of the 5th graders' life lesson projects and respond in writing on a discussion board as to which work of Shakespeare the 5th graders' life lesson connected to.

Step 6: Students will compose an essay that will be made up of 4 paragraphs. (Introduction, body paragraph 1 (interview connected to work of Shakespeare), body paragraph 2 (5th graders' project connected to work of Shakespeare) and conclusion).

Step 7: Students will be asked to create 4 visuals using their iPad Pros that represent each of their paragraphs and verbally present their findings to the class.

Even though this project is not complete, as I reflect, I love thinking of the process that we went through. We started with, "What is the objective? What is the learning goal/outcome?" followed by asking ourselves, "What occurs within the book and how can we connect this to our project?" I loved how we found a way to use the 7 works of Shakespeare that are truly discussed throughout the book within our project. Students are able to dive deeper into the works of Shakespeare while also making a real-world connection to the fact that Shakespeare used literature to teach life lessons. I also love the fact that this project connected not two, but three classes -the middle school students, the 5th graders, and the upper school students who will be teaching the middle school students interview skills. Looking forward to seeing how these turn out and the awesome learning that takes place along the way!

Monday, September 26, 2016

Authentic Experiences with Canva

A 5th grade Fundamental Writing teacher came to me last week seeking help. She said that in the past she has had her students list 7-8 life lessons that were learned from one particular subject. For example, a student may choose to list 7-8 life lessons learned from football, or dance, or George Washington. In the past, she would have her students use Keynote to deliver a presentation to their fellow students in order to create an authentic audience providing the students with a chance to share their passions with their classmates. However, this year, she felt as though due to time restraints (Welcome to teaching, right?! Time is our enemy!) she didn't see it plausible to put aside as much time as she spent last year for the students to create and present using Keynote. She still wanted the students to complete the project as their was great learning that came with it, just on a smaller scale. As I started to think about her objectives, I was searching for a way for the students to still create some sort of visual representation to go along with their life lessons. This is where Canva stumbled into my life. The Director of Modern Learning, my boss, at our school uses Canva on a regular basis when he makes his own presentation and swears by it so I thought this would be a great time to give it a shot.

Before we jump into that, let's go backwards for just a second. Originally, I suggested that the teacher use Adobe Spark Page with her students to create the visual for this project. Luckily, this teacher rocks and tested out Adobe Spark Page before she used it in class. She first used the app flawlessly as an adult and then thought, "Hmm let me pretend to be a 5th grader and make sure it will work for them." Lucky she did because in order to use Adobe Spark Page, you must be 13. Clearly, we could have asked our students to change their birthdate, but that, first and foremost wouldn't be honest, and secondly, what would we be teaching our students if we lead them down this path? So, we went back to the drawing boards and decided that Canva was the best app for this particular objective. Canva is SUPER user friendly, fun, and allows for a lot of creativity. Canva provides you with many different templates to choose from when creating your visual. For this particular project, we chose to use the Poster template with our students. For homework the night before using Canva, we asked the kids to download Canva and to "play around" with the app to get familiar with it. And of course, to spark interest into the next day. One of the beautiful things about Canva is that when you first download the app, they actually walk you through a tutorial. But not just any tutorial. Their tutorial teaches you and then asks you to demonstrate your learning. For example, they show you how to change the font and then they put you to the test and actually have you changed a font style. The screen will then say something like, "Great job!" before moving on to the next skill. I loved this feature as an adult, but especially for our students. I didn't even have to teach them how to use the app because the app taught them for me! Canva, thanks for making my life easier! The next day in class we asked the students to create a Canva poster that visually showed 4-5 of their life lessons. The students were able to create their entire project in about 30-45 minutes. They then added their poster to their google drive folder, located the link to the poster, and added the link to a google doc that the teacher created so that other students could view and access their presentation. Students then viewed each other's work and verbally provided feedback.

Student example:

https://drive.google.com/a/oakridgeowls.net/file/d/0B6-94JxBvry0dDhfbUtwU1RBR0E/view

Tuesday, September 13, 2016

Using Seesaw App in a Science Class

Have you tried out Seesaw for your elementary aged kids yet? If you haven't, I suggest you check it out! What is Seesaw? According to Seesaw's page, "Seesaw empowers students of any age to independently document what they are learning in school."


Why am I loving Seesaw?
Seesaw acts as a digital portfolio that allows students to have authentic audiences for their work. Most importantly, students are the creators of their knowledge; I also love the feature that allows me to send them images, videos or links. A great way to flip your classroom! Students could be pre-exposed to a concept the night before you teach the topic by adding videos that you create using something like Edpuzzle, Screencastomatic, Explain Everything, or Show Me (read about Edpuzzle idea here, read about using Screencastomatic here, learn about using Educreations here). 

How do you capture student learning?
Students can add photos, videos, drawings, images, notes, and even links to show their understanding of a concept. They can then like and/or comment on each other's posts. (This feature can always be turned off if you would prefer for them not to like/comment on each other's work. However, I would argue that this would be a great way to model to young students appropriate ways to like/comment on each other's work. They will be liking and commenting on each other's social media accounts more than likely one day, so why not start by teaching them how to appropriately use this feature at young ages?)  Once students create their video, for example, they then add their creation to their "journal" by selecting their name in the class list. 


How do students join a class?
Students will download the Seesaw app, select "I'm a student," and scan your class QR code or enter a class code. Be looking for another blogpost about having students sign up using their google accounts in order to access more than one class. For example, our 4th graders use Seesaw in 3 different classes so we had them sign-in via google in order to add all 3 classes to their account. 

Check out this great video that a 4th grader at our school created to show her understanding of an animal cell. Would a worksheet show this depth of understanding? 

Twitter in Education

In June of 2013, I took the plunge and joined the Twitter nation. Little did I know what impact Twitter would play in my role as an educator. I use Twitter to network, steal ideas (isn't that what teaching is all about?), share my ideas with the world, ask questions, connect with companies to pose a question and the list goes on and on. (Head over to this post to read about a cool Twitter encounter I had with EdPuzzle. )

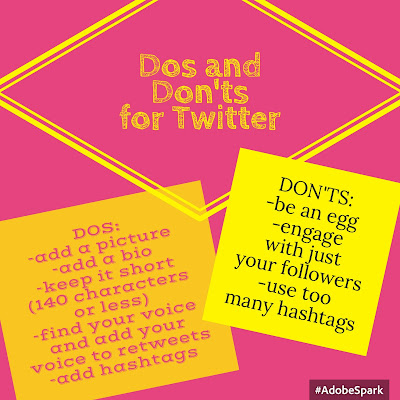
If you have not already joined the Twitter nation, I would challenge you with finding your own voice and joining. A few big dos and don'ts for Twitter:


(I used Adobe Spark Post to create the graphic above. Took me less than 10 minutes to create this simple graphic. Great app if you are looking for a way to have your students create some sort of image to explain a concept.) 

I also created this google doc to share 5 different links with you all which includes:
-Twitter for Beginners
-Top 10 Hashtags all Teachers Should Follow
-20 Most Useful Hashtags in Education
-100 Education Twitter Accounts to Follow
-The Complete Guide to Twitter Hashtags for Education 

Wednesday, September 7, 2016

Acting as an Instructional Coach

This August marked the beginning of year 2 for me acting as Oakridge's Learn21 Specialist. AKA- Educational Technology Coach; Instructional Coach. My role includes partnering with teachers, co-teaching, researching innovative ideas, and so in, in order to incorporate more 21st century teaching at our school. Luckily, I work with an amazing group of teachers who are welcoming, inviting, and encouraging of my role.

This year on top of observing in order to fully get a read on their classroom and topics each teacher is teaching, I have begun leading "Tech Talks." Within a five-day week I choose three different times to discuss the same topic. Usually I offer a time before school, during lunch, and after school in order to hopefully accommodate each teacher's schedule. During the "Tech Talk" I spend about 15-20 minutes sharing a topic, discussing the topic with the teachers, and putting the topic into real use. For example, last during "Tech Talk" we discussed Mac Basics and shortcuts. (You can read about the shortcuts I shared with the teachers here.) The goal of the "Tech Talks" is to spend a few minutes with teachers differentiated the learning at their appropriate level. I have enjoyed these talks thus far because it gives me a chance to share ideas in a smaller setting, practice the ideas with the teachers in real time, and most importantly, bond and create a relationship with my coworkers. Acting as a coach is all about having a relationship first.

Mac Basics

This year we switched from using PCs to using Macs in our Middle School. With that said, many teachers are new to using Macs. The Mac shortcuts are different than PC shortcuts so I created a google doc and a screencast to share a few of my favorite mac basics/shortcuts with our teachers.

What are some of your favorite Mac Basics?

Mac Basics Google Doc- https://drive.google.com/a/oakridgeowls.net/file/d/0B1t-RizQNJivMjU2V2J3R0J0SXM/view?usp=sharing

Mac Basics Screencast- https://docs.google.com/document/d/1a0JmiWIimhzw17lhgABiPZg61WIOlv5R-pGoHP2d4og/edit?usp=sharing

Formative Assessment- Socrative in a Math Class

When you hear the word "assessment," what comes to mind? Do you picture a hard copy of a test with true/false, multiple choice, and short answer questions? Do you automatically think of formative assessment? Is this the only way to assess our students? How often should we be assessing our students and what is the best method to assess them?

As a math teacher it is imperative that I assess my students on a regular/daily/constant basis. Are they understanding the concept? Do they get the bigger picture? Many times my formative assessments include having the students orally answer, demonstrating on the board, demonstrating on mini white boards, and so on, but this year we decided to give Socrative a shot. (Here you can read my blogpost about Socrative and how to use in your classroom.) I have used Socrative many times with my 4th graders, but this was the first time that I used the app as a test review. I chose to use the quick question feature on the app because I did not want to pre-make a quiz. I would orally ask my students true/false and multiple choice questions that correlated with topics that I wanted them to master. For example, unit 1 discussed geometry. When using Socrative I would ask things like, "True or false- This (pointing to a rectangular piece of paper on the wall in my classroom) is a regular polygon." I would project the answers on the board and discuss with my students. Socrative allowed for me to not only quickly assess what they understand and what they didn't, but it also gave every student a voice. The quiet kids participated, the kids who love to participate regularly were quieted down some to give others a chance to shine, the kids who mastered the concepts participated, the kids who needed a little extra help or needed to be re-taught the concept participated, and the list goes on.

The next day in class, my teammate who team teaches math with me used Socrative in a similar manner and loved it. She loved the fact that she knew what each and every kid was thinking and what concepts were mastered and what were not. She loved that she could hide their names so that kids didn't feel embarrassed if they answered incorrectly. We plan to use Socrative regularly in math to check for understanding.

Monday, April 18, 2016

Nearpod for Newbies

After reading Alice Keeler's tweet (see image below) about digital tools that provided our students with immediate feedback, I was inspired to try out one of her suggestions with my students.
The following day, I gave Nearpod a shot and it did not disappoint! For 4th grade social studies, we use a curriculum called TCI that is AMAZING! Incredibly hands-on, user friendly, and definitely created with the student in mind. But, like every curriculum, there are some features that I wish they would improve upon or adjust. With each chapter comes a pre-made power point presentation that does not allow you to download. Because I cannot download the presentation, I cannot upload the presentation to websites like Pear Deck that would allow me to make the presentation interactive. When I gave Nearpod a shot, I took screenshots of my lesson and used those images when I created my Nearpod lesson. That way, I did not have to 100% create a presentation from scratch.

What is Nearpod?

  • an interactive presentation and assessment tool
  • presentations can contain:
    • polls
    • videos
    • images
    • quizzes
    • drawing-boards
    • web content

Why did I love Nearpod?

  • super easy to create lessons
  • it's free
  • students' screens mimic teacher's screen and is teacher paced
  • every student participates and is involved in the conversation and not just your all-star students
  • students are given immediate feedback 
  • students do not have to have a login (simply use the class code that you project on screen)
  • energy in the room was much higher and interactive than normal
  • students were engaged in the conversation and we ended the lesson with students begging me to use Nearpod again
  • took a simple lesson to the next level of engagement
To use Nearpod, first you will need to set up an account at www.nearpod.com
After you set up your account, you will then need to create your lesson. To view a how-to video, click  here or here.
Once your lesson is created and the questions have been inserted throughout your lesson, you will want to share your lesson with your students. A class code will be provided similar to the image below. 
Your student can access Nearpod as an app or it is also web-based. As the students open their app or web, they will want to insert the class code. 

Students will be prompted to enter their name or nickname.


Below is a sample of what one of the questions will look like on the student's screen. 


Below is an example of what the results look like when shared with the students. This was probably my favorite feature. I loved that students had to respond individually, but once all of the responses were collected, I could choose to share the results with my class. The students did not see what each person answered individually, but rather saw that percentage the class as a whole responded with. The responses allowed me to decide whether they were ready for the next concept, or if we needed to hold a further, more in-depth conversation about that topic. The kids LOVED this feature as well and it led to a great math discussion of percentages. Cross-Curricular instruction was occuring that was not even intended to occur! 


Questions can also be open-ended questions.


Wednesday, March 23, 2016

MakerSpace for Math Class

As the 4th graders embarked on their journey to learn how to find the area and perimeter for triangles and quadrangles, I wondered if there was an activity that they could complete in our MakerSpace to truly have them build, create, critically think, or problem solve something that would put their area and perimeter knowledge to good, real-world use. After meeting with our MakerSpace teacher and finding out that she was truly using her area and perimeter knowledge at home to build her dog a doghouse, we thought, "Let's have our kids construct doghouses out of cardboard boxes!" 

So often math revolves around the following: 
  • whole group lesson (I am going to show you on the white board how to solve these problems)
  • independent practice (AKA- worksheets)
  • graded assignments 
  • tests
Many times we miss:
  • real-world application
  • true critical thinking (rather than, regurgitation of equations and inputting of numbers to solve a problem)
  • constructing of something by putting that knowledge to the test
When we began the project with our students we simply thought that the objectives would include using area and perimeter to create a doghouse along with collaboration, communication, creative thinking, problem solving, inquiry and so on. However, what came out of the project was so much more than that!

To start, I told the students that we were going to work in groups to construct a doghouse that would house my dog, Macy. The only parameters for the project included the following:
  • students had to give me a blueprint with all sides, base and roof measured out in inches 
  • area and perimeter for each side, roof, and base must be provided
  • doghouse must be big enough to house Macy but not too big (I provided her measurements)
As the students began to create their blueprints, I noticed the variety of methods they set about within their groups to construct the doghouse. Had I passed out a worksheet, they all would have, for the most part, solved the equations the same way, silently at their seats. I would have collected the worksheets, graded them, retaught the lesson to students who did not master the concept and moved on. However, with this assignment, the students were sprawled out on the floor. Some were using rulers to measure out the house, others were using pencil and paper, and many chose to find apps that allowed them to create an actual blueprint on their devices. One of my favorite things that came about with this project was the following conversation that took place with a student:
"Mrs. Read, can the doorway be a circle rather than a rectangle?" (When you assign a MakerSpace project, you must be ready to provide, "Yes and," answers rather than, "No, you can't do that," answers. You must allow your students some freedom to explore and learn.)
"I am not going to say no, but I will warn you of this. I asked that you provide the area and perimeter of each shape you use. I have not taught you how to find the circumference of a circle just yet. Keep that in mind."
No more than 5-10 minutes later, the student comes back to me with his piece of paper and says, "Mrs. Read, I know you said you hadn't taught us how to find the circumference of a circle, but I googled it. When I googled it, I discovered that there was a formula. Well, I didn't understand the formula so I watched a video. After watching a video, I went back to my worksheet, figured out the radius of the circle, and solved for the circumference. Here is my work."
Ummm... what?! Amazing! Would this kind of thinking every played out had I handed him a worksheet? Nope. 

As the students worked through their constructions, I heard conversations amongst students such as:
"Wait, you measured that side wrong." "It doesn't really matter." "Yes! It absolutely does! If you measure the side wrong, it will throw off all of our calculations when it comes to the area and perimeter! Please measure again."

"What if instead of making your typical 4-sided doghouse we make a doghouse that is an octagonal shape?" 

Results from the project:
  • higher level thinking
  • extreme collaboration
  • communication
  • critical thinking
  • problem solving
  • inquiry
  • fun
  • hands-on learning
  • authentic learning
  • group work skills
Once the projects were completed, I instructed the student's to give an "elevator speech" describing their project. (Elevator speech= presenting your topic in about 30 seconds to a minute. Coined the name "elevator speech" because it is about the same amount of time it takes people to ride up or down an elevator.) During their brief speech, they were to try to describe what their group did well and what they needed to work on in the future. After each group presented, I had the students complete a self and peer evaluation to rate how well they worked with their teammates and how well their teammates worked with them.  I confidentially shared the feedback with the students but did not tell them which students voted them which score. 


Monday, March 7, 2016

6 Picture Story Update

Recently I posted about the "5 Picture Story" idea, which you can read here. Our 6th grade English teacher adapted the idea to fit her project which she is calling, "6 Picture Story."

Her key learning objectives for this project:

  1. understand the importance and use of images in conveying a story (visual rhetoric of sorts)
  2. using words strategically to convey an idea (mini grammar, rhetoric, and communication focus such as limited words)
  3. learning and using new technologies, specifically the Pages App


To introduce the lesson, she began by asking what you need to tell a story and prodded their answers until someone came up with "words." She then told them that we weren't going to be using many words (specifically 6) to tell an autobiographical story. They talked about the use of images and how we could use visuals to also depict a story. She then presented her example that she had created. (As teachers, we tend to leave this step out. We assume that if we provide an example to our students, this will inhibit their creativity rather than foster it. I myself do not love providing samples for this very reason. However, I have noticed that by not providing a sample, many times the outcome is not pretty. The kids drop the ball and really, it was me. I dropped the ball by not providing a sample to allow them to guide them through the process.) Next, the students followed all the steps of the writing process (brainstorm, plan, draft, and revise) for their Pages document, brainstorming and planning the 6 words and images separately before drafting and revising the final product. Next, they peer reviewed the documents and then she gave them a short lesson on presentation skills allowing time for a presentation practice run. Finally, each student presented their finished product to the class. Below are a couple student samples from this project.

Tuesday, March 1, 2016

A Trip Around the World in Math Class

Math Learning Objective:
Learn how to add and subtract large numbers

Normally I would have:

  • led a whole group learning session on how to add and subtract large numbers
  • practice on white boards
  • complete graded activity 
This time I:
  • still led a whole group learning session on how to add and subtract large numbers
Here is where the change came into play... instead of having them practice on their white boards, we pretended that we were going to take a trip to Cairo, Egypt. However, we had two choices: we could fly to Africa via way of Rome, or fly to Africa via way of Athens. The students had to now research: 
  • distance from DFW to Rome
  • distance from Rome to Cairo
  • distance from DFW to Athens
  • distance from Athens to Cairo
Not only did the students learn how to add and subtract large numbers, but they also had a chance to learn about our world. This math activity led to, "What would we do while we were there? What type of clothing should we pack? What types of foods would we eat?" My learning objective was met, but in a much deeper sense. I have learned that all of us have creative juices flowing, we just have to be willing to think of things differently. Keep your learning objective at the front of your mind, but ask yourself, "How can I meet this learning objective in a different way than the traditional way?"

Google Earth

The time time has come for our 6th graders to learn about Ancient Greece. Instead of just reading about Greece, how about we "visit" Greece this year? That sounds more exciting, engaging, and authentic to me than opening a textbook and reading about how Greece came to be. But how? How can we "visit" Greece from the great state of Texas? Welcome Google Earth!

By using Google Earth, you can virtually fly to anywhere in the world in real time. To learn more about using Google Earth, visit this Google support page

Ideas of how to use Google Earth in the classroom:

  1. When you begin studying a new region within the United States, visit that region to learn about different landmarks.
  2. When students share about their summer, winter and spring vacations, have them share by taking the class on a tour of that location.
  3. Science- When teaching about different parts of the world, coral reef, volcanos and so forth, use google earth to view that part of the world rather than simply talk about it.


Links for ideas of using Google Earth in the classroom:

  1. http://digitalexplorer.com/2010/01/12/40-ideas-on-using-google-earth-and-maps-in-the-classroom/
  2. https://www.pinterest.com/farrahrosenthal/google-earth-ideas/
  3. http://k12teacherstaffdevelopment.com/tlb/google-earth-in-the-classroom/

Google Drawing Ideas

Google Drawing Lesson Idea
Lesson: Prior to learning about the founding and colonizing of Europe, students will find a picture of Jamestown and insert speech bubbles guessing what the American Indians and/or Europeans would have said. (They could then post their pictures to www.padlet.com so that everyone in the class could view.) After reading about and discussing the founding of Jamestown, students would then go back to their image and correct their speech bubbles to represent history. 
You can find my drawing sample here.

I created a template that could be used here

10 Ideas of how to use Google Drawings in the classroom:


Taken from Shakeuplearning.com

Remembering the Why

"It's hard!"
"They layout is weird."
"We have to write in first-person from the viewpoint of a historical figure and it is really hard to do that."
"Can't we just take a written test instead?"

We could take a written test instead, but we enjoy torturing you kids. ;)

The quotes above were just a few of the complaints we heard from our 7th graders after their first few posts on their blog. A few months ago I blogged about a Cross-Divisional Blogging activity occurring between our 4th and 7th grade students. You can read that blog here.

When we introduced the lesson, Mr. Millians, the 7th grade history teacher, and I were so pumped to create this relationship between two grade levels and were also excited to challenge our students to think differently than the traditional "let's read section 2, complete a worksheet, and take a test" history class. But... man oh man did the kids challenge us! When we started to feel their frustrations and push back, we questioned ourselves as teachers. "Is this worth it? Should we continue? Are the kids right?" Anytime your students act as though they do not enjoy a lesson, you always reflect and take a few moments to really figure out what is going on in their minds and how we can comfort them. After reflecting upon a class period where the students shared their emotions with us (and good grief, 7th graders will be honest with you about their emotions!), Mr. Millians and I felt as though this activity was more necessary to continue than ever before. What we realized they were saying was, "Ugh! Why are you making us think differently? For years, you have taught us to sit and listen, complete a worksheet, take a written test, and move on to the next chapter. Now, you want us to actually think and apply?!" The kids were frustrated with the concept of application. Not the concept of a blog. At first, I thought they were frustrated with the platform we were using, but then I quickly realized they were frustrated that we were breaking a cycle that we, as teachers, have engrained in them for so long. We were adding depth and application to a history class. (Insert audible gasp from students here.)

Looking back, I wish we would have added in the "why" when we introduced the idea of the blog and collaboration project. I wish we would have held a detailed conversation about why were doing this activity and been 100% honest with the kids. I wish we would have talked about things like:

  • Research a blog and look at their style of writing
  • What is the purpose of this activity?
  • Why are we having you write from the first person point of view of a historical figure?
  • Why are we not simply having you read chapter 1, and summarize on a blog post?
  • Why is it important to write from that person's perspective?
I truly think adding in the "why" into our preliminary conversation with the students, could have helped with some of the frustrations the students were feeling. Would it truly have avoided these feelings? No. Why? Because 7th graders like to (insert word deleted as a wonderful, former teacher use to always say) complain. However, it would have at least shared with them the reason behind us challenging them as thinkers. 

Virtual Valentine's

In January, we decided to take a leap and sign up the three, fourth grade classes to take part in a "Virtual Valentine's Day" exchange.

What is a Virtual Valentine's?
By taking part in the Virtual Valentine's Exchange, our class was agreeing to:

  • create virtual Valentine's for another class
  • respond via email to the other class
  • share our virtual Valentine's 
  • figure out how far in miles we were from the other class
Why take part in this type of exchange?
When we originally signed up, our learning objective was to flatten the world and expose our students to another set of students within our world. We were hoping to be connected with a class far across the country or even in another country. However, our learning objectives grew drastically. By taking part in the Virtual Valentine's exchange, we not only flattened the world, but our students were also exposed to:
  • weather discussions
  • technology skills (copy, paste, a new website, embed) 
  • writing practice
  • inquiry
We truly never expected our kids to learn so much from a simple Valentine's exchange. It was evident that our kids needed more practice with technology skills as this assignment exposed those gaps. Our students had never embedded a link before and this activity taught them how to do that. They also learned how to use a new website and brainstormed ways that we could use this website in class.

So what did the Virtual Valentine's exchange look like?

The teacher from New Jersey reached out to my class via email.

We responded to her email as a class.

Her class asked us a few questions.


As a class, we responded to those questions and then asked her class questions.
Mrs. S's class responded to our questions and my students found it funny that they had to research rodeos. It was a great discussion of life in the south versus life living in the east coast. We talked about ranches and farms that exist here versus what their land was like. Since we have been discussing the 13 colonies in social studies, it was perfect timing to talk about New Jersey's land offerings and what jobs people hold now that they also held back in the 1600s and 1700s. 

At this point, our classes began working on their Virtual Valentine's "gift" or creation. The Virtual Valentine's team provided us with these ideas on things we could create for the other class:

Since we had never used Buncee before, our class decided to give it a try. It ended up being a super easy website to use and our kids loved it! In fact, the day after using this website to create virtual valentine's, the science teacher used bungee in class. She had her students demonstrate similarities and differences between vertebrates and invertebrates. 
Here are a few examples of the buncees our students created. 


Mrs. Seidler's class, the class we were matched up with, chose to send us a fun video. Watch video here.

What a fun experience that I hope to continue in the future!  As I said earlier, our learning objective originally was to flatten the world and simply do something fun and different. Something to break the traditional learning day. This project became so much more than that. The students learned about another part of our country, but also learned a few new technology skills as well. I challenge you to break the daily cycle and try something new and different with your kiddos!